In my last blog post, I shared that creating boom card decks was at the bottom of my long to-do list. Well, I can proudly say that I’ve finally crossed it off of my list!
I kept putting it off because, as with anything new, there is a learning curve. I needed uninterrupted time where I could be 100% focused on the task. I knew that I would need to take several planning steps before I could even begin to create my first deck:
- Select a client and goal to address.
- Decide what type of activity I wanted to create for the client.
- Create my list of stimulus items.
- Find the pictures I needed for the stimulus items.
Having overcome the first two steps, I felt confident enough to move forward.
So where did I begin? For me it helped to do a trial run with a Google Slide deck first. While this is not a necessary step, it was perfect for helping me visualize the type of activity I could create with a boom deck. This trial run occurred over a week before I created my boom card deck, so I will not include this in the directions for you. Basically, I’ve done the background work for you for this particular type of “hidden pictures” activity.
Step 1:
For my toddler clients, I always try to create my lesson plans the day before. This gives me time to communicate with parents in advance so they can come to the session prepared with the toys we will be using. So while I was planning for my session, I thought that a customized Boom Card deck would be a perfect addition to today’s lesson. I created a Toddlers in Telepractice online course that includes 15 speech therapy lesson plans that are ready to go. This evolved from the themes that I’ve been using with my clients over the past two months. So for me, planning for sessions has been a combination of using my existing themed lesson plans and creating new ones (that I then add to my online course). These lesson plans can be utilized with toddlers who have a wide range of goals, but today I wanted to get some additional trials for the long “a” vowel. So it was the perfect inspiration for this boom card deck.
Step 2:
I’ve been using free boom card decks that are created by other people for months. Chances are, if there is an activity that you want to do, there is a boom deck for it! What I’ve found is that sometimes you want a specific word list or combination that no one else has created yet. From what I’ve seen, a “hidden picture” boom card deck seemed like the ideal format for this task.
Step 3:
For today’s activity, I wanted long “a” words, preferably CVC. I decided on a list of 8 “ail” words: pail, tale, mail, etc. Now that I had the word list, how was I going to find the pictures?…Enter Boom Learning Images (and a little help from Google).
Step 4:
My theme for the day was The Very Hungry Caterpillar, and I wanted the butterfly to be the hidden picture. So I went to Google to find the free clip art image of the butterfly. Next, I discovered all of the lovely LOW COST images for sale on Boom Learning. Though the images were not completely free, I spent less than a dollar for 7 pictures. Not bad!
So, how did I get my ideas to an actual boom deck?! Well… I tried searching the demo videos on Boom Learning’s YouTube channel. After browsing through the topics and viewing the first couple minutes of a few different videos, I hadn’t found exactly what I was looking for. So I decided to give it a try and figure it out on my own. Let’s just say I was pleasantly surprised at how easy it was! While I consider myself to be very tech savvy, one of the main reasons why I’ve been avoiding creating my own Boom cards is because it seems overly complicated. Well, my friends, I am happy to report that it is not! I know that I haven’t just made a new discovery (Boom cards have been around for several years). But I hope that this step-by-step guide will help make it less intimidating by simplifying the process so you can quickly create your own Boom Card decks.
Now before we get into the fine details, I’d like to ask you to open your Boom account now and go to the “Studio.” It will be much easier if you can read the steps while you walk through them now. Ready? Here we go!
Once you’re in the Studio, follow these 10 easy steps to create your Boom Card deck:
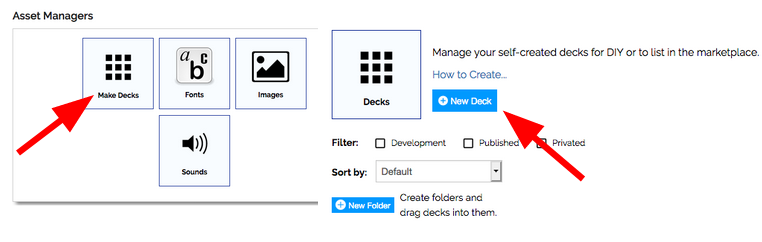
1.Click “Make decks” then “New Deck.”
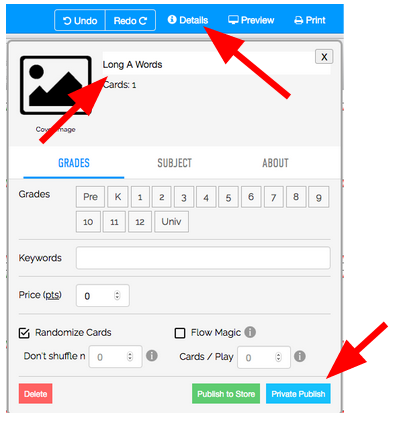
2.Click “Details.” You can then click on “Untitled Deck” to enter a name for your deck. You can change whatever settings you’d like, but this is not as important if you’re not selling your decks. This is where you can choose to set your deck as private or public and whether to randomize the order of cards.
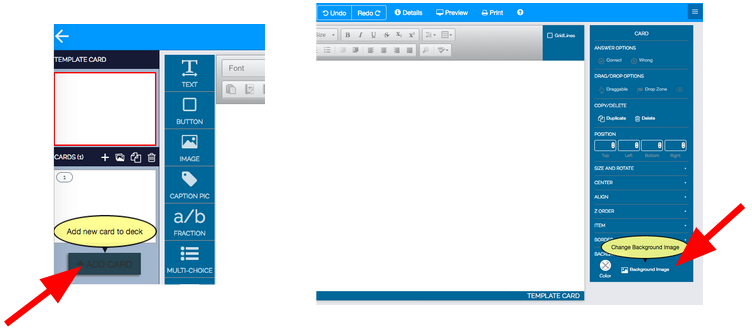
3.Click on “Add Card.
4.”Click “Background image” and insert what your hidden picture is. This is where I inserted the image of the butterfly.
5.Click on the “Image” icon and drag it over to your Boom card. You will probably need to resize your image. You can do this by clicking on the edge and dragging your mouse. You will repeat this process for each image. This is also where you can choose to “Buy” from the Boom Card Store if you don’t have your images already.
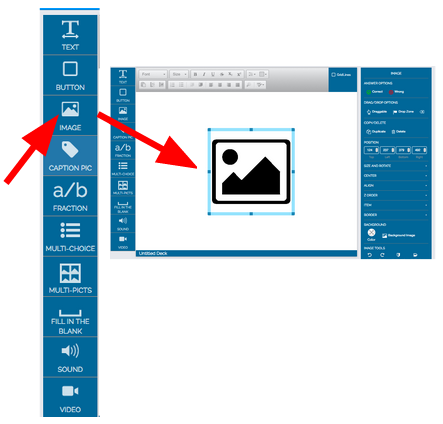
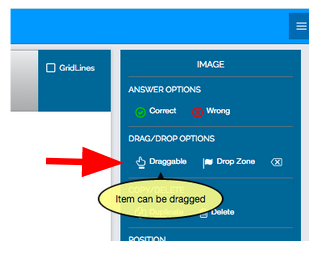
6.Select each image, then navigate to your “Image” options on the right side of the page. Click “Draggable” for each image.
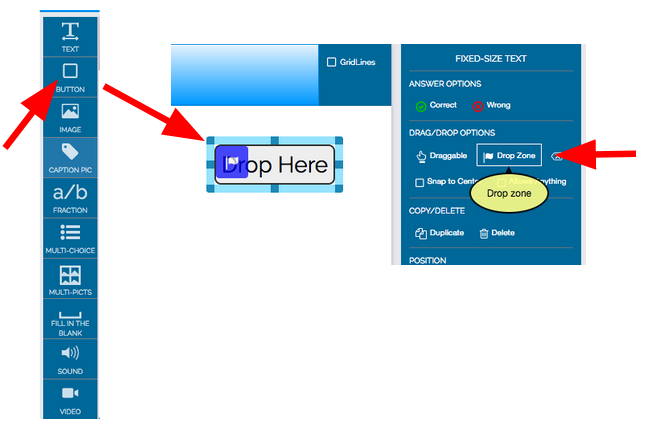
7.From the left menu, click on the “Button” icon to add a “Drop Zone.” You can change the text of the box by typing directly into it. I just used “Drop Here.”
8.Once the Button is selected, click “Drop Zone.” Then check the box below it for “Allows anything.”
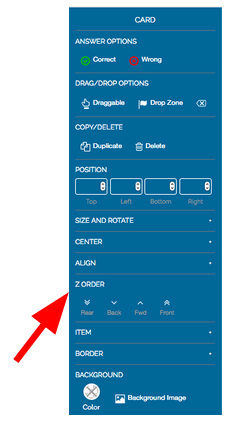
9.If you want certain items to be “on top,” you can click on “Z Order” to move those items to the front or back.
10.Your deck is automatically saved, and you can preview it at any time. Your deck is also automatically added to your library. If you want to come back later to revise it, just start at Step #1 above.
Bonus Tip:
If you know what you want to create, it will be easier if you gather your images first, whether it is from the Boom store or another source. Add the images to your library and organize them into folders. This will make your deck-creating process run smoothly.
Congratulations on making your first Boom Card deck! If you need more help with creating Boom Card decks, please check out my two-hour recorded Boom Basics Workshop.